How To Create A Slack Channel – Your Ultimate Guide!

Because remote workers often work from the comfort of their homes, staying connected is key. Channels in Slack offer a virtual space for us to chat, share messages or files, and collaborate seamlessly with our teams.
A Slack channel can be a great asset for managing projects and organizing team communication. Let’s learn how to create a channel to help us work smarter, not harder.
Whether we’re sharing important updates or brainstorming ideas, a Slack channel is the perfect place to bring our team together. By understanding the basics of channel creation and how files are shared in a public channel, we can ensure that our communications are efficient and secure.
Grab your laptop and stay tuned as we walk through the steps to establish a channel that suits our team’s needs and enhances our workflow.
How To Create A Slack Channel — Getting Started
Before we create a Slack channel, we must grasp the basics. Slack channels are dedicated spaces within a Slack workspace where conversations happen. They’re ideal for company-wide announcements, where everyone is automatically added to and unable to leave, ensuring that no one misses out on the latest news.
Understanding What a Slack Channel Is
A Slack channel is a centralized hub for discussions, decisions, and data within the Slack workspace. The magic happens in these dedicated spaces, allowing us to focus conversations on specific topics or projects.
Think of channels as the virtual equivalent of team meetings or office bulletin boards, but more organized and accessible.
Channels are the heartbeat of Slack, enabling us to streamline our communication and get work done efficiently.
They’re not just for chatting; we can also use them for company-wide announcements, where everyone in our Slack workspace is automatically added to and unable to leave, ensuring essential information is communicated to all team members.
The Various Types of Slack Channels
The diversity of channels we can create within our Slack workspace is impressive. Each is tailored to meet different needs and preferences, ensuring every conversation has a home where it can thrive.
Private vs Public Channels
Understanding the difference between private and public channels is crucial in our Slack workspace. Public channels are open for all team members to join, enhancing transparency and inclusivity. They’re perfect for general discussions where everyone’s input is valued.
On the other hand, private channels are by invitation only and are suited for sensitive topics that require discretion.
If we ever need to convert a public channel to a private one, we can do so to ensure confidentiality. This process is straightforward on both PC and Slack mobile. We simply navigate the channel details and select the option to convert the channel. Remember, this action is irreversible, so we must be certain before making a channel private.

Shared Channels for Cross-Company Collaboration
The Slack app brings down the walls between companies with shared channels. These channels efficiently enable cross-company collaboration, allowing us to work with external partners as if they were part of our team.
We must manage these channels thoughtfully, keeping confidential discussions secure while enabling seamless communication with external collaborators.
When setting up shared channels, we can tailor them to serve different collaborative needs, ensuring that important information flows freely but securely. The Slack app’s features empower us to manage these channels efficiently, fostering productive relationships with our partners while safeguarding our internal conversations.
We’ll need to use the Slack app to set up a shared Slack channel. First, we create a new channel, pick an existing one, and then invite the other company to join. These channels are marked with a special icon, so we know they’re shared.
It’s different from regular channels because they allow us to work with external partners directly, keeping everything in one tidy place. Handy, right?
Preparing To Create Your Slack Channel
Before we create a Slack channel, let’s remember that our ability to send messages or files and the types of files shared in a public channel may vary. Workspace owners can restrict who can create channels, so we must check if we have the green light.
Once we’re ready, launch the Slack app and click the add channels option to start our journey.
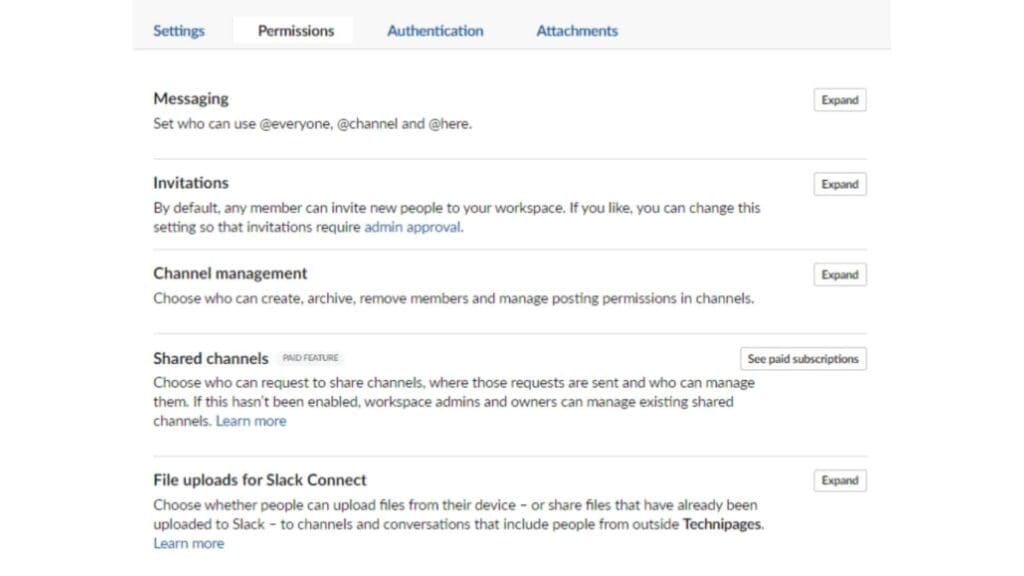
Checking Your Permissions for Channel Creation
We must verify our role before creating a new space for our team. Not everyone is free to start a new channel; this is usually reserved for channel managers or those with similar permissions. Knowing our level of access ensures we follow the right protocol and respect the structure of our workspace.
As channel managers, we shape our team’s communication landscape. We must ensure that new channels serve a purpose and enhance collaboration without cluttering our workspace with unnecessary spaces. Creating a channel comes with maintenance duty, so let’s ensure we’re up for the task.
Setting Up Slack on Different Devices
Setting up Slack is a breeze on a computer or mobile device. Once installed, we’re just a click or a tap away from unlocking a world of seamless communication. With the app ready, we can easily click ‘create’ on the PC or tap ‘create’ on our mobile devices to craft custom channels.
Installing Slack on Your Laptop
Getting Slack up and running on our PCs is straightforward. We start by downloading the app from the official website. Once installed, we open the app, sign in to our workspace, and get ready to click ‘create.’
The next step is getting familiar with the layout, especially where to click the ‘channel’ button to initiate our new communication hub.
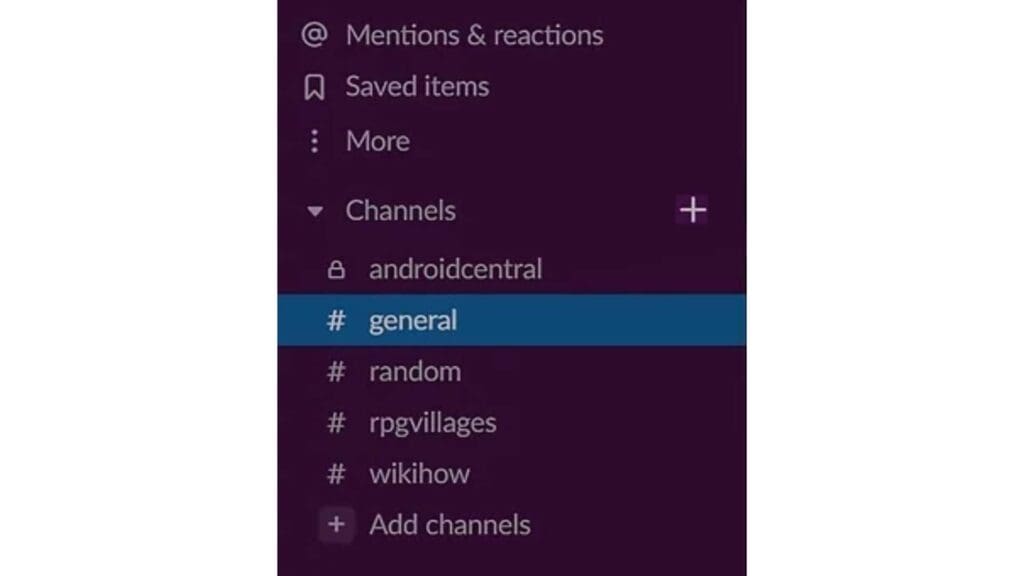
Once logged in, the Slack interface is user-friendly and intuitive. The left sidebar is our navigation panel, where we can explore existing channels or create our own. With a simple click on the ‘Create Channel’ button, we’re on our way to enhancing our team’s collaboration and productivity.
Setting Up Slack on Android
Setting up Slack on an Android device is simple for team members. We start by downloading the mobile app from the Google Play Store. Once installed, we tap ‘create’ to sign in to our workspace.
The app’s design is optimized for mobile use, with the button in the lower-right corner to start a new conversation and the upper-right corner for more options.
The convenience of Slack’s mobile app allows us to stay connected with our team from anywhere. After signing in, we can join existing conversations or tap ‘create’ to start our own. The plus button in the lower-right corner beckons us to add a new channel, and the menu in the upper-right corner gives us access to additional features.
Step-By-Step: Creating A New Slack Channel
Now that we’re all set up let’s walk through bringing our new channel to life. It’s a simple journey that will significantly impact our team’s communication.
Initiating a New Channel on PC and Mobile
Creating a channel is consistent across devices. On the laptop, we navigate to the left sidebar and click the channel plus icon. The process is similar on mobile, where we tap the ‘+’ sign to add a new channel. Each step is designed to be intuitive, allowing us to focus on the purpose of the channel rather than the process.

Customizing Channel Settings for Optimal Use
After we click ‘Create,’ it’s time to customize our channel. Here, we decide on the channel’s name, purpose, and whether it’s public or private. We also have the option to invite team members. Each setting is an opportunity to ensure the channel serves our team effectively.
By clicking the button in the sidebar, we create the channel and enter the details that define our channel’s function and culture.
Inviting Teammates and Assigning Roles
The final step in channel creation is bringing in our teammates. We can invite them during setup or afterward, ensuring the right people are in the loop. Assigning roles is also crucial, as it helps define who can post or manage the channel. With our team assembled, we’re ready to collaborate and achieve our goals.
Best Practices for Maintaining a Healthy Channel Environment
Setting clear guidelines is key to keeping our Slack channel vibrant and positive. We encourage everyone to share ideas freely but with respect for others. It’s also helpful to clean up inactive threads regularly and keep discussions on topic.
Fostering a supportive atmosphere boosts engagement and keeps our channel a place where everyone wants to contribute.
Advanced Channel Management
We must delve into more advanced management once we’ve mastered creating new channels. This means monitoring the conversations and ensuring everyone follows the channel’s purpose.
We might need to step in sometimes to guide discussions back on track or address any issues that arise, ensuring our channel remains a focused and productive space for collaboration.
Transitioning a Public Channel to a Private One
If we ever need to have confidential discussions, there might come a time when we need to convert a public channel to a private one. This is a big decision because it changes public channels’ transparency and inclusivity.
Before we convert the channel, we ensure everyone knows why this change is necessary and how it will benefit our teamwork.
Making this switch on Slack mobile is pretty straightforward. We navigate the channel details and find the option to change the channel’s privacy settings. Once we confirm this change, the channel becomes a safe space for more sensitive conversations, and we can manage who has access to the information shared within it.
Structuring Your Channels for Project Management
When we manage projects, organizing our channels efficiently is a huge time-saver. It helps us keep track of different aspects of the project and ensures that relevant discussions and updates are easy to find. With a clear structure, our team can focus on the tasks without getting lost in a sea of messages.
How to Group Channels into Sections
Slack allows us to organize our channels into sections, like having drawers for different topics. We start by dragging and dropping related channels together, making it simpler to navigate through our workspace.

This organization trick helps us find the right channel quickly and keeps our Slack tidy, almost like a well-organized desk where everything is just a reach away.
Enhancing Collaboration Within Slack Channels
For us, Slack is all about teamwork. It’s where we come together, share ideas, and push our projects forward. Using Slack wisely, we turn our collective efforts into real results, creating a space where collaboration and how we work daily aren’t just buzzwords.
Leveraging Automation to Boost Productivity
In our quest for efficiency, we embrace automation. Setting up reminders, automating status updates, and using bots to handle routine tasks frees up our time. This way, we can focus on our jobs’ creative and critical thinking parts, making the most of every workday with Slack as our digital assistant.
Integrating Apps and Bots like Zapier and ChatGPT
We love finding new ways to supercharge our Slack channels, and integrating apps and bots is like adding superpowers to our toolkit. With Zapier, we can connect Slack to other tools, automate tasks, and sync information seamlessly. It’s like having a bridge between Slack and the rest of our digital world.
For instance, we can set up a Zap that creates a new channel whenever a new project begins in our project management tool. Specifically, we use Zapier to streamline our social media updates. A Zap automatically sends a message to a designated Slack channel when we have a new blog post, prompting the team to share it across our platforms.
And then there’s ChatGPT, our friendly AI assistant. It helps us draft quick replies, set up polls, or generate ideas for our next project. It assists us within Slack by preparing prompt responses or summarizing lengthy messages, saving time and keeping communications concise.
ChatGPT helps us generate engaging responses for customer service queries directly within Slack, ensuring prompt and consistent communication with our clients.
With these smart tools in our Slack, we’re not just chatting on our Slack channel; we’re building a powerhouse of productivity that keeps us all a step ahead.
Utilizing Slack Channels for Different Team Sizes and Types
Whether our team is big or small or what kind of work we do, Slack fits us just right. It’s like a cozy meeting room that can stretch to fit everyone. We use channels to keep our conversations organized so every voice is heard and every idea has room to grow.
Customizing Slack Workflows for Various Team Dynamics
Every team has its rhythm and style; we can tailor our workflows to match in Slack. For our creative team, we might set up a channel for brainstorming while our developers have a space for technical discussions. By customizing our Slack to our team’s dynamics, we create a digital workspace that feels just as unique as we are.
We also monitor our interactions. If we notice that some folks are quieter, we might encourage them or adjust our channels to be more inclusive. For example, we create dedicated channels for specific interests or roles, ensuring every team member can find a community within our larger workspace.
It’s all about making Slack a place where everyone can do their best work together.
The Last Word On Slack Channels
As we’ve explored the nuances of creating and managing Slack channels, it’s clear that their potential extends beyond simple message exchanges. Embracing the full suite of tools that Slack provides, including the often-underutilized audio and video functionalities, can transform our channels into dynamic spaces for clearer and more personal communication, enhancing teamwork.
Staying organized within these channels is also crucial. In the bustling environment of messages and files, leveraging Slack’s built-in features, such as notification management and the ability to star pivotal channels, helps keep essential information readily accessible.
Ultimately, the art of mastering Slack channels lies not only in their creation but in continuously refining them to foster a collaborative, engaging, and enjoyable workspace for our team.
FAQs
1. Can I create a new channel if I’m not an admin?
Yes, you can usually create a new channel unless your Slack admin has restricted permissions. To do so, simply click the ‘+’ button in the sidebar and select ‘Create a new channel.’ You’ll need to enter the channel name and decide if it should be public or private before inviting your teammates.
2. How do I find and join public channels in Slack?
Joining public channels is easy. Click on the ‘Channels’ header in the sidebar to show you a list of available channels. You can browse them or use the search bar to find a specific one. When you find one you like, just select it and click ‘Join Channel’ to start participating.
3. What should I do if a channel is no longer active or relevant?
If a channel is no longer needed, it’s best to archive it to keep your Slack workspace organized. To do this, go to the channel you want to archive, click the three dots in the top-right corner, and select ‘Archive this channel.’ Confirm your choice; the channel will be closed to new messages but still accessible for reference.
4. How can I integrate apps like Zapier and ChatGPT into my Slack workspace?
To integrate apps like Zapier and ChatGPT, you’ll need to add them from Slack’s App Directory. Once added, you can set up Zaps to connect Slack with other tools or use ChatGPT to assist with messaging. These integrations can save time and streamline your workflows within the platform.


